
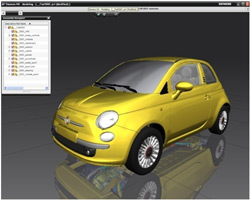
What is NX?
March 1, 2022
4D Systems Expansion Announcement
December 14, 2023
Siemens NX Training Video Series
In our Siemens NX Training video series, we present four key Siemens NX training videos including:
- Introduction to 3D Scan data using Siemens NX
- Siemens NX CAD – NX Mach Advantage Package Demonstration
- 4D Systems webinar on 3D Printing – Using Siemens NX and 3D Scan Data
- 4D Systems – NX Additive Webinar
Siemens NX Training Video – Introduction to 3D Scan data using Siemens NX
In this video you will learn about working With 3D Scan Data. Several key points include:
- With the rapid influx of additive manufacturing (3D Printing) and rapid prototyping, there is now an increased need to take objects scanned in 3D and work with them within CAD Software.
- Examples: (Medical Scans for custom fitted medical devices, Object replication, Rapid fixture design, Simulation and Testing)
- Today we will be taking a scan of shoe inserts and modify them within NX to make them ready to be used for printing or further modification.
- Step one is opening a new Modeling part.
- Make sure the “Reverse Engineering” ribbon tab is displayed (right click on ribbon bar)
- Import the file (mainly STL files), using the Import STL function, making sure the Facet Body Output Type is set to “NX”
- The objects are brought in as a facet body.
- We can see these objects need some cleanup. There are holes and rough patches in the top face and the bottom of the insert has a honeycomb design.
- We will be using the convergent modeling tools within the Reverse Engineering ribbon tab to clean the model up before converting it to a NX object.
- Snip regions of suspect geometry to remove areas of concern.
- Move on to fill hole (options within fill hole include tangent, linear, curvature, etc.)
- Snip all around edge to separate top surface from bottom.
- Convert Geometry to convergent body (to be able to modify using NX feature tools)
- Delete bottom geometry using part navigator
- Make a base sheet/extrusion to project curves on.
- Project edge curves of the inserts onto the sheet.
- Use smooth curve to smooth the projected curves using settings of 20 degrees and 0.010 tolerances.
- Extend sheet of edges (3in) to make a cutting plane.
- Extrude the smoothed edges enough to cover entire body.
- Use trim body to cut the extrusion by the insert surface.
- Hide all unnecessary bodies.
Siemens NX CAD – NX Mach Advantage Package Demonstration
In this webinar we will be taking a look at some of the features in the different NX CAD Mach packages as well as showing a demo of the Annex Mach Advantage features.
4d systems is a premier provider of Siemens PLM and robotic simulation software our team of engineers bring together decades of experience in product life cycle management solution implementation simulation engineering and manufacturing.
NX Mach software products are prepackaged solutions delivering high performance cad capabilities of NX software the leading solution for mechanical design they offer competitively priced solutions tailored to specific product development roles practices and processes in four performance tiers value-added upgrades are available to move customers from one tier to the next each package delivers complete capabilities for production work.
If you’re in the mold or die business, these tools are really powerful to allow you have all that mold and die checking built into your tools as well as having all the feature and assembly modeling that Mach 3 offers.
Using Siemens NX and 3D Scan Data
This will be covering 3d printing aspects of NX. We are looking at the parts that made out of the 3d scans of the shoe inserts. We took a shoe insert and the top surface which we wanted to model and replaced the bottom surface with a nice flat surface that we’re going to be able to put right directly on our 3d printing bed so this will kind of highlight the abilities of taking a 3d scan going straight into a 3d print environment.
3D Printing Outline:
- Welcome to 4D Systems Introduction to NX Video on 3D Printing
- We will be taking an object we worked with in the previous video working with 3D Scan Data.
- This object was shoe inserts we imported into NX, cleaned up, and added some standard modeling features.
- We will now be starting the Additive Manufacturing application to prepare these objects for 3d printing.
- In this application you can save your print surface and volume to ensure your design is manufacture able.
- You can also add support material in this step.
- Set the print volume to our printer. (TAZ 5 Height (z) = 9.8, Length (y) = 10.8, Width (x) = 11.4, OriginX = -5.7, OriginY = -5.4, OriginZ = 0)
- We are going to import our part using the add component dialog.
- The part is too large to fit on the print bed.
- Go into the part
- Scale body (0.02 Uniform)
- Save as the part as a scaled model
- Reimport the model.
- Fix on print bed.
- Export to STL
- Need to use separate slicer software (Cura etc.)
4D Systems – NX Additive Webinar
Learn how Siemens NX’s Additive Manufacturing Technology can be used effectively to create 3D printed parts. In this video, we will setup a build tray for a set of
gripper fingers on our training robot and actually execute and print it on a 3d printer.